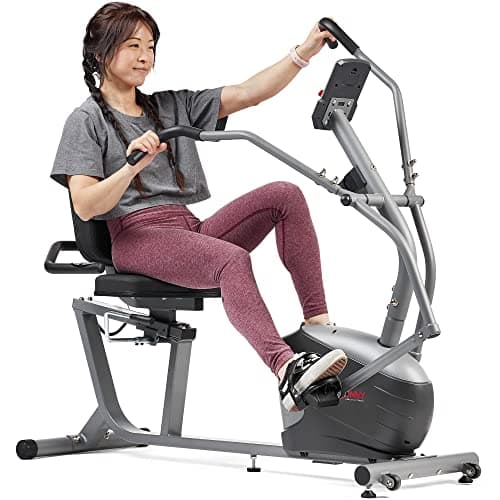
The single most important thing you do on a recumbent bike happens before you pedal: how far the seat sits from the pedals. Get that fore-aft distance right and the machine is kind to your knees. Get it wrong and no amount of low resistance will save them.
Set the seat so your knee keeps a slight bend at the farthest pedal— never a locked-straight leg. Too far back and the knee over-extends and reaches at the bottom of every stroke; too close and it closes too tightly at the top. Sit down, put the ball of your foot on the far pedal, and slide the seat until the leg is almost straight but still comfortably bent. That fore-aft distance matters more for your knees than the machine itself.
People shop for a recumbent bike as if the machine is what protects their knees. Mostly, it is not — not on its own. The seat position is. Two people can ride the identical bike at the identical resistance and have completely different days, because one has the seat set so the knee moves through a comfortable range and the other has it set so the joint reaches or pinches on every turn. This is the setting almost nobody adjusts and almost everybody should, and it takes about two minutes.
Why the fore-aft distance is the setting that matters
On a recumbent bike, your legs point forward into the pedals rather than down, so the thing you adjust is not saddle height but how far the seat sits back from the cranks — the fore-aft distance. That one measurement sets the arc your knee travels through on every single revolution, and you make that arc hundreds of times in a session. Small errors do not stay small; they repeat.
Here is the mechanism, because it is worth understanding rather than memorizing. When the seat is too far back, your leg has to stretch to reach the far pedal, and at the bottom of the stroke the knee over-extends — it straightens all the way and reaches for a pedal that is a touch too far away. The joint ends up taking the load at the very end of its range, which is the part it likes least. When the seat is too close, the opposite happens: at the near pedal the knee folds up into a sharp, tight angle, closing further than it needs to on every turn. Both faults are invisible while you sit still and obvious once you are pedaling, if you know to feel for them.
The reason cycling is worth getting right, rather than giving up on, is that the motion itself is good for joints when the range is comfortable. The Arthritis Foundation points out that cycling’s continuous, smooth motion moves the joint through its range and helps produce the fluid that lubricates it — which is exactly the benefit you lose if the seat forces the knee to lock out or pinch instead of turning cleanly. Set the distance right and you keep the good part of the motion; set it wrong and you keep the load without the smoothness.
The knee angle to aim for
Forget protractors and degree figures — you are not going to measure your own knee mid-ride, and you do not need to. Aim for one plain thing: a slight bend at the far pedal. When the pedal is at its farthest point from the seat, your knee should be nearly straight but not completely, with an unmistakable bit of give still in it.
Two things to avoid frame the target from either side:
Never a locked-straight leg. If the knee snaps to fully straight and stops at the bottom of the stroke, the seat is too far back. A locked leg puts the load on the joint instead of the muscle and kills the smooth, rolling feel that makes a recumbent gentle.
Never a knee crammed up tight. If the knee closes into a sharp angle and feels crowded toward your chest at the near pedal, the seat is too close. That over-closed angle is its own kind of strain, and it is the reason a too-near seat can nag at the front of the knee.
The comfortable middle — almost straight at the far pedal, comfortably open at the near one, the whole circle feeling like it flows rather than reaches or pinches — is the setting you want. If you would like a fuller walk through what a recumbent does and does not ask of the joint, our guide to recumbent bikes and your knees covers it.
Setting it, step by step
This is the whole procedure. It genuinely takes two minutes.
Sit all the way back in the seat. Get your back against the backrest the way you will actually ride, not perched forward on the edge. Where your hips sit is the reference point for everything that follows, so settle in first.
Put the ball of your foot on the pedal and roll it to the farthest point. Not your heel, not your arch — the ball of the foot, where you would naturally push. Send that pedal to its farthest position from the seat.
Look at that knee. It should be nearly straight with a slight bend still in it. If the leg is stretched dead straight or your hips are rocking to reach, the seat is too far back. If the knee is still noticeably bent and you feel folded up, it is too close.
Slide the seat and repeat.Most recumbents move the seat with a lever or a knob on the rail. Move it one notch, sit back again, and re-check at the far pedal. Adjust in small steps — the right spot is often just one position away from a wrong one.
Pedal a few slow, easy revolutions. The static check gets you close; the moving check confirms it. Turn the pedals gently and feel the whole circle. Nothing should reach, pinch, or make your hips shift side to side. If your foot slides toward the pedal edge to reach, you are still a touch too far back.
Note the setting. If anyone else rides the bike, they will move the seat, and their setting is not yours. A piece of tape, a photo, or just remembering the notch number saves you starting from scratch every time.
One extra note on foot placement: keep the ball of your foot over the pedal spindle and let your heel stay roughly level, rather than pointing your toes to reach a pedal that is too far away. Toe-reaching is a sign the seat wants to come forward, not a technique to master.
If the seat is already at the front of its rail and you are still reaching, the bike is simply too long for your leg — that is a fit problem rather than a setup one, and no adjustment will fix it. The minimum inseam each manufacturer publishes is what decides it, and we rank the machines by that number on our shortlist for short riders. The same applies in reverse: if the seat is hard against the back of its rail and the knee is still clearly bent at the far pedal, the bike is too short for you, and the maximum inseam each maker publishes is what decides that — ranked on our shortlist for tall riders.
When the seat is right and the knee still complains
Setting the seat correctly fixes the mechanical, avoidable share of knee discomfort, and for a lot of people that is the whole story. But it is not a cure, and it cannot be. If a knee keeps objecting after the fore-aft distance is genuinely dialed in — not the ordinary stiffness that eases as you warm up, but pain that builds during a ride or lingers the next day — that is your signal to stop adjusting settings and talk to your doctor or a physical therapist. They can watch the actual joint move, which no article can, and tell you what range and load it should be working in. Nobody here is a clinician.
The reassuring part is that gentle, regular movement is generally on your side. The Arthritis Foundation is clear that movement tends to help osteoarthritic joints rather than aggravate them — a joint that keeps moving through a comfortable range usually does better than one rested into stiffness. A well-set recumbent seat is one of the easier ways to get that movement without pounding, which is why it is worth the two minutes. And the payoff is real: comfortable sessions are the ones you actually repeat, and repeating them is how the minutes add up toward the CDC’s guideline of at least 150 minutes a week of moderate activity for adults 65 and over. A seat that hurts is a seat you quietly stop using.
General information, not medical advice. Tread & Tone is written by an enthusiast, not a clinician. Nobody here is a doctor, a physical therapist or a trainer, and nothing on this site has been medically reviewed. Talk to your doctor or physical therapist before starting something new, particularly after surgery, a fall, or a change in medication.
Questions people ask
How far away should the seat be on a recumbent bike?+
Far enough that your knee still has a slight bend when the pedal is at its farthest point — never so far that the leg straightens and locks out. A good check: with the ball of your foot on the far pedal, your knee should not fully extend, and it should not feel like it is reaching. If the leg locks straight, the seat is too far back; if the knee snaps up tight toward your chest at the near pedal, it is too close.
What knee angle should I aim for on a recumbent bike?+
A slight, comfortable bend at the far pedal — a knee that is nearly, but not completely, straightened. You are not trying to hit a number with a protractor. You are avoiding two extremes: a leg that locks out fully at the bottom of the stroke, and a knee that closes into a sharp angle at the top. Somewhere in between, where the whole revolution feels smooth and nothing pinches, is the target.
Why does my knee hurt on a recumbent bike?+
The most common mechanical reason is seat distance. Set too far back, the knee over-extends and reaches at the bottom of every stroke; set too close, it closes too tightly at the top. Either one, repeated hundreds of times a session, can leave a knee sore even at gentle resistance. Fix the fore-aft position first. If a knee keeps objecting after the seat is set correctly, that is a conversation for your doctor or physical therapist, not a setting to push through.
Should my leg fully straighten at the bottom of the pedal stroke?+
No. A fully locked-out leg at the far pedal is the setting to avoid. When the knee snaps to completely straight and stops there, the joint takes the load instead of the muscle, and you lose the smooth, continuous motion that makes cycling gentle in the first place. Keep a slight bend so the leg is always working through a comfortable range rather than banging into the end of it.
How often should I check the seat position?+
Every time, if more than one person uses the bike, because moving the seat for someone taller or shorter changes your setting completely. If it is only you, check it whenever the ride starts to feel off — a knee that is newly sore, a reach that feels longer than usual, feet slipping toward the pedal edges. It takes under two minutes, so there is no reason to ride on a setting you are not sure about.
CDC — Older Adult Activity: An Overview — At least 150 minutes a week of moderate-intensity activity, 2 days of muscle strengthening, plus balance activities for adults 65 and over (read July 24, 2026)
Product measurements are cited individually inside each Fit-to-You panel, against the manufacturer page or dated retailer listing they were read from.