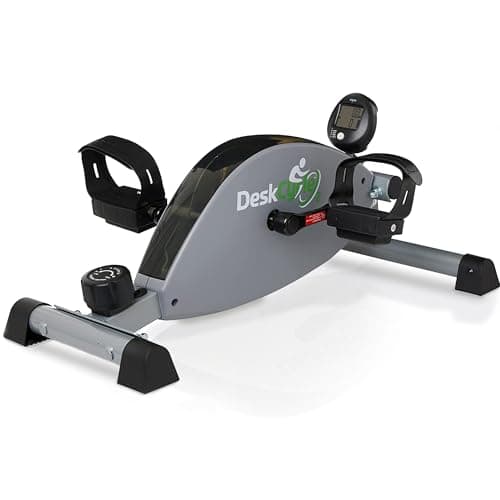
Where to put it, how to stop it sliding, how to set the tension and how long to go for — the small setup details that decide whether a set of pedals becomes a daily habit or a closet ornament.
A pedal exerciser is a small set of pedals on a weighted frame that sits under a stable chair or on a table. Put it against a wall or a non-slip mat, set the tension low enough for a smooth continuous motion, sit back without slumping, and start with a few minutes rather than a full workout.
A pedal exerciser is about as simple as exercise equipment gets: a small set of pedals mounted on a low, weighted frame. Set it on the floor under a chair and it works your legs; lift it onto a table and it works your arms. That simplicity is exactly why it either becomes a daily habit or ends up in a closet — there is no dashboard to master and no program to follow, so whether it works for you comes down to a handful of setup details that nobody tells you about. Get the chair, the placement, the tension, and the timing right, and the pedals become the easiest few minutes of movement in your day. Get them wrong and the unit slides around, your knees ache, and it quietly gets shoved aside. This guide is those details.
One honest thing to keep in mind throughout: a pedal exerciser is a modest, gentle addition to a mostly seated day, not a replacement for a full machine. It is wonderful for keeping a joint moving and adding a little easy activity while you sit, and those small amounts genuinely add up. But if you are after a real cardio session, that is a different tool — we will point you to one at the end. Held to what it actually is, a pedal exerciser is one of the friendliest ways to start moving again.
Choose the right chair first
Before you think about the pedals at all, think about what you are going to sit in, because the chair does half the work. The one rule that matters most: it must not be on wheels. An office chair with castors will roll backward away from the pedals the moment you push, which is both annoying and unsafe. A firm dining chair or a sturdy, solid armchair is what you want — something that stays exactly where you put it.
Look for a chair that is firm rather than deep and soft. A squashy sofa lets you sink and slump, which rounds your back and puts your legs at an awkward angle to the pedals. A firmer seat keeps you upright and lets you sit back properly. Armrests are a real bonus: they give you something to hold as you lower yourself down and push yourself up, which matters if getting in and out of chairs is not effortless, and they help you keep a tall posture while you pedal. Finally, mind the height. You want to sit at a level where your knees feel comfortable when your feet are on the pedals — not hiked up high, not stretched down low. If your usual chair sits you too low, a firm cushion can lift you into a better position.
Place it so it does not slide
The most common complaint about pedal exercisers, by a wide margin, is that they slide across the floor. It is also the easiest thing to fix, and it is worth fixing before your first proper session so you never form a bad impression of the machine. The problem is simple physics: as you push the pedals, the frame wants to travel in the opposite direction, and on a smooth hard floor there is nothing to stop it.
Give it something to brace against. The neatest solution is to set the unit against a wall or the solid base of a heavy piece of furniture, so when the frame tries to creep forward it simply cannot go anywhere. Failing that, place it on a non-slip mat or a rug with some grip — a rubber-backed exercise mat or even a bath mat works — so the feet bite into the surface instead of skating over it. Best of all, start from a unit that is built not to move. Models with rubberized, anti-slip feet stay planted far better than bare plastic ones; our review of the Drive Medical RTL10273 looks at exactly this, because a stable base is one of the things that separates a pedal exerciser you use from one you fight. Combine anti-slip feet with a wall or a mat and the sliding problem disappears entirely.
Legs on the floor, or arms on a table
The same unit does two different jobs depending on where you put it, and it is worth knowing both because you may want each on different days. For your legs — the usual way — the pedals sit on the floor under your chair. Slide the unit forward or back so that when your feet rest on the pedals, your knees are neither cramped up nor stretched out at the far end of the stroke. You should be able to complete a full, smooth circle without your legs having to reach or fold too tightly.
For your arms, lift the same unit up onto a sturdy table in front of you and turn the pedals with your hands. This is a gentle way to move the shoulders and elbows through their range while seated, and it is useful on days when your legs are tired or sore, or simply to add some upper-body movement. The rules are the same: keep the table solid so nothing tips, keep the tension light, and keep every movement comfortable. Arm cranking can nag at a cranky shoulder faster than leg pedaling nags at a knee, so if a shoulder feels pinchy rather than merely working, ease off or stop. Many people alternate — legs some days, arms others — and the fact that one small device covers both is a good part of why pedal exercisers earn their keep.
Set the tension so the motion stays smooth
Almost every pedal exerciser has a knob or dial that changes how hard the pedals are to push, and the instinct is to crank it up to make the exercise “count.” Resist that instinct. Start at the very lowest setting and only add resistance once easy pedaling genuinely feels too easy. What you are aiming for is a smooth, continuous, comfortable turning of the pedals that you can keep going without straining, gritting your teeth, or jerking the motion along. If the pedaling gets choppy or you find yourself forcing each half-turn, the tension is too high — wind it back down until it is smooth again.
The reason smoothness matters more than effort is that the continuous motion is the point. The Arthritis Foundation notes that a continuous pedaling motion moves the joint through its range and helps produce the fluid that lubricates it. That gentle, repeated circling is what you are there for, and a light tension that lets the motion flow does that job better than a heavy tension that turns every stroke into a fight. Low and smooth beats hard and jerky every time.
Posture, and how long to go for
Once the chair, the placement, and the tension are sorted, the last two things are how you sit and how long you stay. Sit back into the chair rather than perching on the edge, and keep your back reasonably tall instead of slumping down over the pedals. There is no need to hold yourself rigid; just avoid collapsing forward, which is uncomfortable for your back and makes the pedaling feel harder than it is. If your chair has arms, a light hand on them helps you stay settled.
As for how long — start small and build slowly. A few minutes is a perfectly good first session, and stopping while you still feel fresh is far better than pushing until you are sore and putting yourself off. From there, add a minute or two each week and aim to pedal most days rather than doing one heroic session and nothing else. Little and often is the whole philosophy: short, easy, frequent sessions are gentler on stiff joints and much easier to sustain. Over weeks and months, those minutes accumulate toward the CDC’s guideline of at least 150 minutes a week of moderate-intensity activity for adults 65 and over — a target you build toward gradually, not something to reach in a day. And before you begin, the National Institute on Aging advises talking to your doctor before starting something new, which is especially worth doing if you have a joint problem or are recovering from an injury.
Setting it up, step by step
Here is the whole setup in order, so you can run through it the first few times until it becomes second nature. Keep every part of it comfortable — nothing here should be a strain.
Choose a stable chair. Pick a firm chair that does not roll, ideally with armrests, at a height where your knees sit comfortably when your feet are on the pedals.
Position the unit so it cannot slide. Set the pedals against a wall or on a non-slip mat, and choose a model with anti-slip feet so the frame stays put as you pedal.
Set your distance and posture. Sit back in the chair, place your feet on the pedals, and slide the unit so your knees are neither cramped nor overreaching at the far end of the stroke.
Set the tension low. Turn the resistance to an easy setting where you can keep a smooth, comfortable, continuous pedaling motion without straining.
Start with a few minutes. Pedal gently for a few minutes at a pace you could hold for a while, then stop before you feel tired or sore.
Build up little and often. Add a minute or two each week and repeat most days, working gradually toward your weekly activity target.
Keeping it a habit — and knowing when it is not enough
The reason a pedal exerciser gets used or abandoned usually has nothing to do with the machine and everything to do with where it lives. Keep it out where you will see it — in front of the chair where you read or watch television — and it turns into something you do without thinking during the evening news. Tuck it in a cupboard and it stays there. Pairing the pedals with something you already do every day is the quiet trick that makes little-and-often actually happen. If you want the fuller case for why even these small sessions are worth building in, our guide to the benefits of a pedal exerciser lays it out honestly.
And here is the honest boundary. A pedal exerciser is a gentle, modest addition to a seated day. It is brilliant at keeping a joint moving and topping up your daily activity, but it will not give you a demanding cardio workout, and it is not meant to. If you reach the point where easy pedaling feels too light and you want more — more resistance, more of a genuine session, more range of motion — that is a sign you have outgrown it, which is a good problem to have. At that stage a proper machine makes sense, and an under-desk elliptical is the natural next step up, giving you a fuller motion and more resistance while staying just as seated and low-impact.
None of this is complicated, which is the point. A stable chair that does not roll, the unit braced against a wall or a mat so it cannot slide, the tension set low enough for a smooth continuous motion, a tall and settled posture, and a few minutes to start with, most days, building slowly. Get those small things right and a set of pedals under your chair becomes one of the easiest habits to keep. If you are still deciding which one to buy, our shortlist of the best pedal exercisers does the vetting for you.
General information, not medical advice. Tread & Tone is written by an enthusiast, not a clinician. Nobody here is a doctor, a physical therapist or a trainer, and nothing on this site has been medically reviewed. Talk to your doctor or physical therapist before starting something new, particularly after surgery, a fall, or a change in medication.
Questions people ask
What can I realistically expect from a pedal exerciser?+
Expect a gentle, modest addition to your day rather than a full workout. A pedal exerciser is just a small set of pedals on a weighted frame that sits under a chair or on a table — it keeps a joint moving and adds a little easy activity while you sit, which is genuinely worthwhile. But it is not a substitute for a proper machine like a recumbent bike or an under-desk elliptical. Think of it as the easiest way to add a few minutes of movement to a mostly seated day, and stack those minutes up over time.
What kind of chair should I use with it?+
A firm, stable chair that does not have wheels. A dining chair or a sturdy armchair is ideal; an office chair on castors is the one to avoid, because it can roll away from the pedals just when you want to push. If the chair has armrests, use them — they give you something to hold when you get in and out and help you keep a tall, settled posture while you pedal. Set yourself at a height where your knees feel comfortable, not cramped up high or stretched down low.
How do I stop the pedals sliding away across the floor?+
This is the single most common frustration, and it has easy fixes. Put the unit against a wall or a heavy piece of furniture so it has something to brace against, or set it on a non-slip mat or a rug so the feet grip. Best of all, choose a model with rubberized anti-slip feet built in. On a hard floor with no mat and no wall, even a well-made unit can creep forward as you pedal, so give it something to hold against before you blame the machine.
Can I use it for my arms as well as my legs?+
Yes, and that is part of the appeal. The same unit that sits on the floor under a chair for your legs can be lifted onto a sturdy table for your arms. Cranking the pedals with your hands is a gentle way to move the shoulders and elbows through their range while seated. Keep the table solid and the tension light, and stop if any shoulder movement feels pinchy rather than simply easy.
How much resistance should I set?+
Less than you might think. Start at the lowest tension and only add a little once easy pedaling feels too easy. The goal is a smooth, continuous, comfortable motion you can keep going without straining or jerking — that steady turning of the joint is the whole point, not how hard it is to push. If you find yourself gritting your teeth or the pedaling gets choppy, the tension is too high. Back it off until it is smooth again.
How long should I use it for each day?+
Start with just a few minutes and build up slowly over weeks. Little and often beats one long session you dread — a few minutes here and there through the day adds up, and it is easier on stiff joints than a single hard push. Over time you can work toward the general activity guidelines for older adults, but there is no rush to get there. Talk to your doctor before starting something new, especially if you have a joint problem or are recovering from an injury.
CDC — Older Adult Activity: An Overview — At least 150 minutes a week of moderate-intensity activity, 2 days of muscle strengthening, plus balance activities for adults 65 and over (read July 24, 2026)