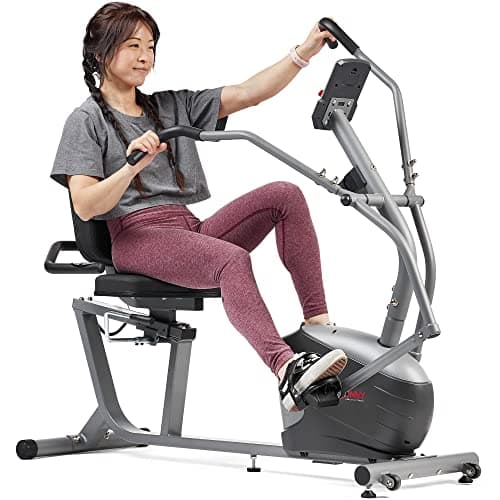
A gentle four-week plan that builds from short, easy sessions to the weekly target — plus the seat setting that matters more than the machine, and the next-morning rule that keeps a sore knee honest.
How this is funded: we earn a commission if you buy through our links, at no extra cost to you. It never changes what we recommend, and every page here names at least one thing we would not buy. Full disclosure.
The short answer
Set the seat so the knee keeps a slight bend, start with about ten easy minutes at the lowest resistance a few times a week, and add a little each week — changing only one thing at a time — until you reach the weekly target over roughly a month. Judge it by how the knee feels the next morning.
The target you are building toward
Before the plan, the destination. The CDC’s guidance for adults 65 and over is at least 150 minutes a week of moderate-intensity activity, plus two days of muscle strengthening and some balance work. On a recumbent bike, 150 minutes is five thirty-minute rides, or six of twenty-five, or any combination that adds up — the weekly total is what matters, not how you slice it.
That number is a destination, not a starting line. If you have been mostly sedentary, or you are riding around a sore knee or hip, trying to hit 150 minutes in the first week is the fastest way to end the first week sore and discouraged. The plan below spreads the climb over a month so that each step is small enough to be boring, which is exactly what you want.
The bike handles the endurance part of that guidance and nothing else. The two days of strengthening and the balance work are separate, and they matter just as much for staying steady on your feet — a recumbent bike does not train balance, because it holds you still. Treat the plan here as the cardio leg of a wider routine, not the whole of it.
Set the seat before you set anything else
This comes first because it decides whether the plan helps you or quietly wears at a joint. The seat position matters more than which machine you own. We would rather you rode the cheapest bike on this site with the seat set correctly than the most expensive one set wrong.
The rule is simple: at the furthest point of the pedal stroke, your knee should keep a slight bend — never lock out straight. Sit on the bike, put your heel on the pedal, and turn it to the point furthest from you. Slide the seat until your leg is almost straight in that position with the knee still a little bent. Then move your foot to its normal position, with the ball of the foot on the pedal, and you will have a comfortable bend throughout. Ride two minutes and check again, because nearly everyone sets it too far back on the first try.
A seat set too far back straightens and over-extends the knee on every single revolution — hundreds of times a session — and a knee that felt fine at minute two will not at minute fifteen. Too close, and you close the joint angle up tight and load the front of the knee instead. Neither shows up immediately, which is why people blame the plan or the bike when the real problem is two inches of seat rail. Our guide on recumbent bikes and knees walks through the setup and the mechanism in more detail.
The four-week plan
The plan below starts shorter than feels worthwhile on purpose, and it changes only one thing at a time. The Arthritis Foundation’s guidance on how much exercise is enough is to build volume gradually rather than all at once, and to let how you feel guide the pace. Every week here rides at the lowest resistance the machine offers — you are buying time in the saddle, not effort, until the last week. Add duration, or frequency, or resistance, but never two of them in the same week.
Week 1 — ten minutes, three times. Lowest resistance. Ten minutes, three days spread across the week, and nothing more even if it feels easy. This week is about proving the seat is right and the knee is quiet the next morning, not about training.
Week 2 — fifteen minutes, three times. If the knee and hip are no worse the mornings after Week 1, add five minutes to each ride. Still the lowest resistance, still three days. That is the only change.
Week 3 — add a day, or add minutes, not both.Either fifteen minutes four times, or twenty minutes three times — whichever fits your week better. Resistance stays at the bottom. Pick one path and hold it for the whole week before deciding.
Week 4 — twenty to twenty-five minutes, four times, and one nudge of resistance.Now, if everything has stayed comfortable, you can raise the resistance by a single level for the first time. By the end of this week you are near four rides of twenty-plus minutes, which puts the CDC’s weekly target within reach the following month.
After four weeks, keep going the same way: one variable at a time, a slower climb than feels reasonable, and a willingness to repeat a week that did not settle. There is no prize for reaching 150 minutes in five weeks instead of ten. The prize is still riding in a year, and the people who get there are almost always the ones who started too slowly.
Resistance and effort: the bottom of the range is the whole game
For most of this plan the top of the resistance range is irrelevant. You will be riding at or near the lowest setting, which means what matters when you shop is whether the machine can express small increments down there at all — an eight-level bike jumps in coarse steps, a twenty-five-level or electronically controlled one lets you nudge the load a hair at a time. A narrow comfort window needs fine control, and that is a low-end feature, not a high-end one.
Why keep the effort so light for so long? Because the joint benefit of a recumbent bike is mostly about motion, not exertion. The Arthritis Foundation explains that cycling’s continuous motion takes a joint through its range, and the more a joint moves that way, the more synovial fluid it produces — the fluid that lubricates it. Smooth, easy, repeated revolutions do that work. Grinding against heavy resistance does not do it better, and it is far more likely to leave a knee complaining.
When you do start raising the effort in Week 4 and beyond, aim for moderate intensity rather than hard. The CDC’s explanation of what counts makes the point that intensity is about your own effort, not a number on the console: moderate means you can talk but not sing, and you notice your breathing has picked up. The same resistance level is easy for one rider and moderate for another, so judge it by that talk test, not by matching a level someone else uses.
The next-morning rule, and making it stick
The single most useful habit in this plan is checking the joint the next morning rather than during the ride. Stiffness that eases as you warm up is normal and usually fine. A knee or hip that is worse the morning after than it was before is the signal to hold the current week, or step back one, before adding anything. That rule is what keeps a slow plan honest, and it is why every step above is written as “if you are no worse, then…”.
Ordinary next-day stiffness that eases off as you move is a comfort problem rather than a warning, and the honest answer to it is a slower week rather than a purchase. If you like having something for it anyway, a foam roller or a massage gun is the usual choice, and Trusted Health Gear’s reviews of recovery tools cover that category in the detail it deserves. Just do not let a gadget talk you past a joint that is telling you to hold the week.
The other habit that decides whether any of this lasts is riding at the same time each day. A recumbent bike is easy to skip precisely because it is comfortable and undramatic, so tie it to something you already do — the morning coffee, the mid-afternoon news, the show you watch after dinner. Ten minutes attached to a fixed anchor survives a busy week; ten minutes “when I get around to it” does not. A bike parked where you see it, ready to ride, is worth more than a better bike in a spare room.
If you are riding after a joint replacement, a recent injury, a fall, or any new or changing pain, talk to your doctor or physical therapist before you start this plan, and again before you raise the effort. They can tell you what range and load your joint should be working in, which is information no plan on a website can supply. Nobody at Tread & Tone is a clinician, and a four-week schedule is a general starting point, not a prescription for your particular knee.
General information, not medical advice. Tread & Tone is written by an enthusiast, not a clinician. Nobody here is a doctor, a physical therapist or a trainer, and nothing on this site has been medically reviewed. Talk to your doctor or physical therapist before starting something new, particularly after surgery, a fall, or a change in medication.
Questions people ask
How long should a senior ride a recumbent bike?+
Start at about ten minutes and build from there. Ten easy minutes a few times in the first week is a real session, not a warm-up, and it is the right starting dose even when it feels too small. Over roughly a month you work toward twenty to thirty minutes at a time. We cover the full picture in our guide on how long seniors should ride a stationary bike.
How many days a week should I ride?+
Three days is a sensible start, spaced so you are not riding two hard days back to back. As the sessions stop leaving you sore the next morning, four or five days a week gets you to the CDC's 150-minute weekly target without any single ride being long. Frequency is usually the gentlest variable to add, because each session stays short.
What resistance should I start with?+
The lowest the machine offers. On a recumbent bike the point of the early weeks is time in the saddle and smooth, continuous motion, not effort, and resistance is the last thing to raise. Once ten to fifteen minutes feels genuinely easy and the knee is quiet the next day, nudge it up a single level and hold there before going further.
Will a recumbent bike help me lose weight?+
It can contribute, but only through the effort and the hours, not the machine itself. The Arthritis Foundation notes that cycling regularly supports weight management, which in turn takes load off weight-bearing joints. A gentle ten-minute ride burns little on its own; weight change comes from riding often, gradually longer, alongside what you eat. No bike burns fat while you sit still.
How soon will I notice results?+
The first thing most people notice within a couple of weeks is that the same ride feels easier — the legs settle sooner and the effort drops. Stamina and the ability to ride longer tend to follow over four to eight weeks of steady sessions. Visible or scale changes take longer and depend on far more than the bike. Judge early progress by ease, not appearance.
Is riding a recumbent bike every day too much?+
For gentle, short sessions it is usually fine, and daily riding at the same time can make the habit easier to keep. The limit is your joints, not the calendar: if a knee or hip is more sore each morning, you are adding too fast and should take rest days. After surgery, an injury, or any new pain, ask your doctor or physical therapist before riding daily.
Sources
CDC — Older Adult Activity: An Overview — At least 150 minutes a week of moderate-intensity activity, 2 days of muscle strengthening, plus balance activities for adults 65 and over (read July 24, 2026)
Seated and back-supported does not mean easy. What decides whether a recumbent bike is a real workout or a gentle warm-up is the resistance and the effort you put in — not the fact that you are sitting down.
An honest answer for older riders: what a seated bike can and cannot do for your weight, why the kitchen matters more than the console, and how to get the most out of the sessions you do.